Wednesday, July 30, 2008

My First Daring Baker's Challenge...and one of my new toys


Ta-da!


Today is officially my "coming out" day. Not in the sense of a blushing debutante (although all of you who think, or would like to think that way, are by all means welcome to do so), but in terms of being a member of the Daring Bakers.

Considering that I have waited a full month (and then some) to participate in the July challenge, I am surprised at how easily I put this task off until the very last minute. Life, and my innate knack for procrastination got into the way. However, this month at least, I have another very valid excuse for not wanting to complete my challenge sooner.


On July 26 2008, I finally received my much-coveted Canon EOS 450d!! YAY!!! I am now a proud owner of a DSLR!! However I feel compelled to warn you that I have not yet mastered the functions of this camera, nor yet feel comfortable using it, in case you expect mind blowing photos. I have lots to learn and a long way to go.


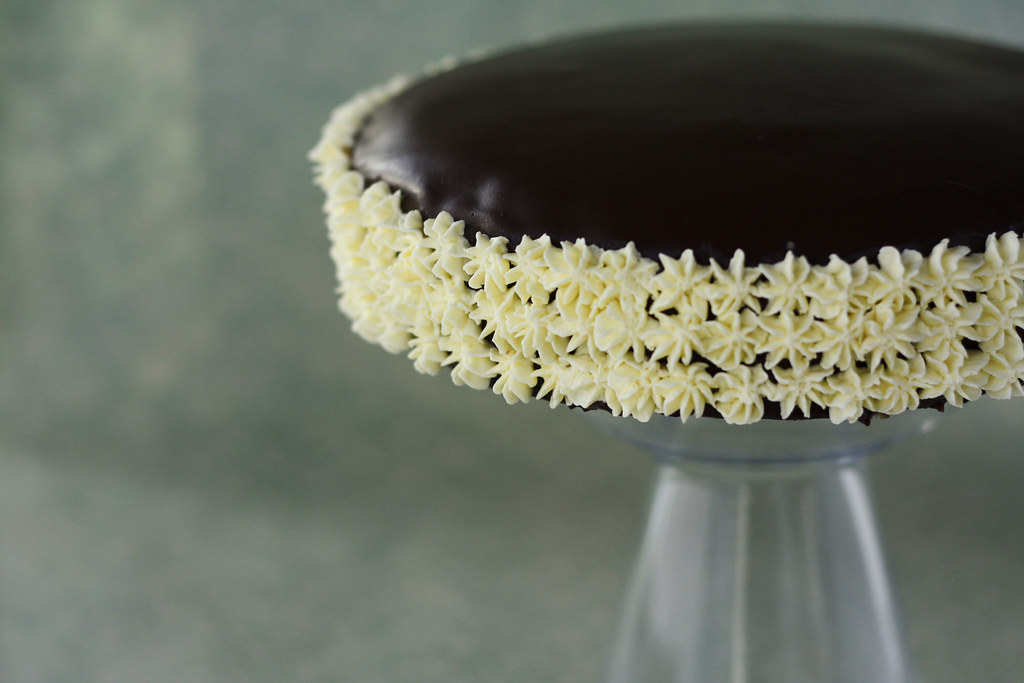
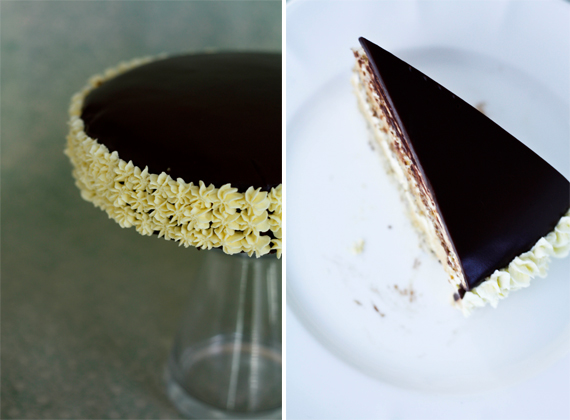
But I digress. This month's challenge is hosted by Chris of Mele Cotte, and the task is to attempt Carol Walter's Filbert Gateau with Praline Buttercream. I could not be more excited!! Layered gateaux are by far my favourite thing to both eat and make. I know this makes me sound a tad masochistic, but I always like a challenge. So thank you Chris, for choosing this cake!!

Oh, and although this cake looks a little on the heavy side (texture, mouthfeel, flavour etc.), it is as light as a goose down pillow!! The swiss meringue buttercream and the whipped cream really made a difference!! One thing that I am not satisfied with though, is that my layers are not perfectly and evenly straight. This, I admit, is my own fault. Due to greed I have decided to lather an excessive amount of buttercream and whipped cream filling onto the cake layers. And due to laziness I had not bothered to pipe and spread them out evenly. This resulted in the afore-mentioned effect on the cake, and in my anguish for being so careless. Oh, and on being careless, I also dunked a whole recipe's worth of praline powder into my buttercream instead of the 1/3 cup stated on the recipe. Sigh.


But at least it was delicious, right?
(J: I think it tasted really good with the full amount anyway. I don't know why you want to make it with only 1/3 cup.)

Bless his soul.


The complete recipe is available on Chris' website. It contains quite a bit of information, thus I will not post it here. But for those of you who have not attempted it, please give it a go; it's really not that difficult if you read all the instruction carefully.


PS. I will update you on my other new toy in the next post.

Tuesday, July 15, 2008

Luscious Red Velvets and New Opportunities


I promised myself that I would be baking and blogging a lot more when my term break commenced a week ago. I have been baking moderately more often, but haven't been blogging very much about them. For this I must apologize.

You see, I received some bad news last week from my restaurant. My boss went around the bush and then in circles explaining himself and the situation that has compelled him to make the sacrifice, but it could be summed up with this sentence: I have been laid-off.

The signs were there all right, my hours were cut down, and even when I get any it seems that I was asked to finish earlier than my scheduled roster, because there was just nothing else for us to do. It is a slow time in the restaurant industry-- we are in the middle of a nasty winter spell and I don't blame people when all they want to do is stay at home curled up underneath a warm blanket. I feel much the same way.

So I have been applying for various jobs and contemplating the next step. I doubt that I will be able to work in a pastry kitchen again until I graduate from culinary school--the Australian Immigration only allow people with International Student Visas to work a maximum of 20 hours per week during term time. I was really lucky that I was able to find myself a part-time job in a pastry kitchen that I can work at for as little as 20 hours a week--most kitchens either demand full-timers that could work 50-60 hour weeks or part-timers that could do 35-40 hour weeks. So whatever jobs I apply for in the meantime will benefit me strictly in terms of cash flow, and maybe, hopefully, I'll learn a few things along the way.


To tell you the truth, I have been contemplating about leaving for quite some time now. I just haven't been able to find a potential job that I would be totally happy with to replace my old one. Plus, I like all the people that I work with, so that makes leaving harder.

But now there is a multitude of possibilities. Opportunities that I have been toying with and fantasizing about for the past few months. Applications for internships that I have procrastinated to put forward into action because I was worried that I would not have time to fit them into my life.

So here's to new possibilities and (hopefully) a new job!!


I made two versions of these red velvet cupcakes. The bright red ones are from Joy the Baker, and the cocoa ones are from Chockylit. I used the recipes for the frostings that each recommended. I have to say though, that Chockylit's frosting is easier to make because it is less prone to splitting. But if you want to try making the brown sugar cream cheese frosting, please follow Joy's guidelines to ensure the best results. As you can see, my brown sugar frosting split a little, and although I did come up with a way to rectify the problem later, I had gotten impatient and piped it on the cupcakes the first chance I got.

If your brown sugar cream cheese frosting splits, put it in a heatproof bowl over a pot of simmering water. Keep stirring, and you will notice that the frosting will turn smooth. But do not take off from the heat yet, or your frosting will split when it cools down. Keep stirring until mixture is warm-ish. Swipe a little of the frosting on your fingertips and rub them together. You should only be a slight graininess. Remove from heat and cool.

I apologize because I could not be more specific about the instructions, but i was purely going by touch. The best way is to try it, let it cool down and see if it turns grainy. If it does, return to the bain-marie( heatproof bowl over a pot of simmering water), and keep it on for a longer period of time. But be careful not to scorch it.

Saturday, July 5, 2008

Remembrance of Things Past, or a Mistake Revisited


No, this post is not about madeleines, as the title so suggestively implied. This is about the first time I made French macarons.

It was December last year, when I finally got my bum off my seat and decided to make some of those wonderful little confections so many food bloggers are blogging about. They are the daintiest, prettiest things , and they are called macarons.

In those photos they looked so tame, so innocent that I thought I'd make them for a family christmas gathering at my J's parents' house. Three days to go, and I thought I would start with the shell, just in case things did not work out. I made the macarons in two ways, one batch of lemon macarons using the Italian meringue method, and another batch of pistachio using the French meringue method, borrowing the recipes that I found on Tartelette's blog.

The Italian meringue lemon macarons turned out just perfect. I was contented and pleased with myself. And then the horror began. My tray of pistachio macarons emerged from the oven as the ugliest things I have ever seen. Lopsided, cracked, and uneven. Not just one or two, but almost all of them. I consoled myself with soothing thoughts; perhaps I had misread the recipe, perhaps it is the humidity in the air (December is summer in Australia), perhaps I have forgotten to add a vital ingredient to the batter. With these uneasy thoughts in my head, I headed to bed.

The next night (I had to work from 9am-8pm that day, almost a double shift but not quite), I went on to make another batch of pistachio macarons. I made sure to add all the ingredients, follow the recipe down to every letter, switch on the air-conditioner in my apartment and let the piped batter stand for a good hour. I waited with my eyes closed my my hands clasped in a prayer.


I could not remember what I said or did when the first tray came out of the oven, looking exactly like their predecessors from the previous night. I must have gone through a shock, because I could not remember stomping or kicking or screaming or cursing, and I am a drama queen with a very hot temper.

What followed afterwards when I regained my memory was a frantically typed email at 1 am in the morning to Helen of Tartelette, whom I see as one of the authorities in macaron making. I was desperate and sent a plea for her to shine light on the art of macaron making. She replied promptly with suggestions in such generous details that I felt instantly reassured. But I have never since tried making French macarons again. Until now.

About two weeks ago J went for a visit to his nonna's house. He brought from there a citrus fruit which looks innocently enough like an orange. But peel the skin away and what greets your tongue is a flavour that has the unmistakable acidity of a lemon. This fruit grew on a tree in his nonna's backyard. It seems that she has grafted an orange tree into a lemon tree and married the pair (I am sure this is not the proper explanation, but it will have to suffice), resulting in this hybrid fruit.


I thought about what I wanted to make with this lem-orange, and decided to revisit my old fears of making macarons, mainly because I think that the sweetness of the macaron shell will foil the tartness of the fruit. This time, though, I made sure to take a few extra precautions (and read Helen's tutorial on the online Dessert Magazine).

When my first batch spread too much and became lopsided and uneven, I gritted my teeth and set my mind on making another one, and another one, and another one still, until I can get it perfect. It seemed that my determination managed to win over the macaron god, because I had the idea to cover my oven fan with a flat baking tray. And so my second batch, though a tad under-folded, yielded beautiful round macarons with perfectly even feet. And we live happily ever after.

I borrowed Helen's recipe for the macarons (Thank you Helen, and if you ever want anything from Australia, just let me know and I'll mail it to you!). The ganache I made, though, was a little too white chocolate-y for my taste, so I'll update the recipe after I develop one that I'm completely happy with. I already have something in mind, so stay tuned!

Tuesday, June 24, 2008

A Gentleman's Cake, and a Befitting Recipient


This is a long overdue post, but I have been struggling to find time to blog this past week because I had an assignment due today, and a change in my usual work roster. Plus, I have been feeling quite on the down-low recently with the winter blues. So my readers, I apologise.

My younger brother celebrated 18 years of life on June 15. And of course, I made him a celebration cake. I had hoped to make something fancy and complicated for his birthday, but boys seem to have a disinclination towards making life difficult for themselves (a trait I should learn and adapt to sometime soon). When I went to him with this question one week before the due date, he looked up from his pile of homework with eager eyes and said, " Can you make me something with both coffee and dark chocolate in it? Nothing too fancy, I just want a plain cake."


In hindsight, it was probably a good decision on his part. This cake is what I would call a gentleman's cake--elegant, restrained, simple and rich in both texture and flavour. What better for a boy on the cusp of becoming a man?

Happy Belated Birthday, my dearest and only brother. I wish you much luck at university next year, and study hard for the entrance exams! Enjoy all the things that come with the big 1-8, but also remember that you can go to jail now!! *wink, wink*


Coffee and chocolate cake
serves 25


Ingredients

400 g dark chocolate
375g unsalted butter, chopped
330g caster sugar
310ml freshly brewed strong coffee
3 large eggs, lightly whisked
375g plain flour
2 teaspoons baking powder


Chocolate Glaze

300 g dark chocolate, chopped
125g unsalted butter, chopped


Preheat oven to 160C. Grease a 20cm round pan, or a 22cm square pan. Combine chocolate, butter, caster sugar and coffee in a saucepan over medium heat until smooth and combined. Remove from heat, add eggs and whisk until combined. Sift together flour and baking powder, add to mixture and stir to mix. Pour mixture into prepared tin and bake for 1 1/2 hour, or until cake crumbs cling to a skewer inserted into the cake. Leave in pan for 10-20 mins before turning out.


Chocolate Glaze

Combine chocolate and butter in a heat-resistant bowl over a saucepan of simmering water, until mixture is smooth and well combined.


To assemble

Trim top of cake to a flat surface if necessary. Turn cake upside down and place on cooling rack. Place cake and cooling rack over a wide, shallow tray and pour glaze over. Smooth with a spatula. Set cake aside until glaze sets, but do not put cake in fridge while setting or the glaze would lose its sheen.


Wednesday, June 18, 2008

I wish I was a Billionaire...

Vera of Baking Obsession, one of my favourite food blogs, tagged me with this questionnaire. Being new to blogging, this is my first time participating. I don't know who came up with the concept at first, but I think it's a good way to get to know other food bloggers a little bit better.
So here goes...

1. What were you doing 10 years ago?

I was 13 years old and at the 6th Grade in Primary School in Singapore. I was sitting for what was called the PSLE, which will basically determine whether or not I would be able to enter a top ranking Secondary School (that's like Junior High).

2.What are 5 non-work things on my to-do list today?

-Upload and edit my photos for the blog
-Read a novel
-Make something using the hybrid lem-orange that my boyfriend gave me, which came from his step-grandmother's backyard
-Check my favourite food blogs for new posts
-Do the laundry and other boring household stuff

3. What snacks do you enjoy?

I enjoy anything sweet and loaded with one or all of the following ingredients: milk, cream, eggs, sugar, butter, flour, fruits, nuts, chocolate, tea, coffee, herbs and spices, maple syrup and honey. I think I covered everything available in a patisserie.

4. What would you do if you became a billionaire?

-Acquire three houses fitted with the best kitchen appliances and ingredients. One in the city, one in the countryside, and one by the beach.
-Build an animal shelter and an animal rescue center.
-Open an old-fashioned little tea and cakes parlour (fine bone china, wallpaper and all the trimmings).
-Travel, travel, travel.

5. Where have you lived?

Firstly, Jakarta, Indonesia. This is where I was born. I was sent away to Singapore to get a better education when I was 9 years old, and it became my home for 9 years. I left it when I turned 18 to come to Melbourne, Australia, and this is where I am now.

6. What jobs have you had?

-My first real job was as a sales assistant at David Jones (one of the largest department store in Australia), where I sold high-end fashion to rich snooty old women who were extremely rude and condescending. I worked there part-time while doing the final year of my bachelor's degree in fashion design.

-I currently work as a part-time Commis Pastry Chef in a restaurant.


Now, if you are still with me, thank you for reading!

Thursday, June 12, 2008

Red shoes, chocolates and Vianne Rocher


I own 2 pairs of red shoes, both which I dearly love. In fact, I don't believe that I have worn anything else on my feet for the past 8 months.

The first is a red satin pair with a pointy front, and black grosgrain trimming round the sides which ends in a neat a ribbon in front. I believe that my feet wore nothing else that summer. This pair has finally been put to its final resting place a few months ago, when the holes and stains from rain, mud and wear have been too obvious to hide. It was still my favourite pair.

Its demise was succeeded by a more ostentatious pair--round-toed flats covered in brilliant scarlet sequins with a red velvet ribbon--much in the fashion of Dorothy's ruby slippers in the 1939 take of the children's novel The Wizard of Oz. This pair is in its stages of retirement--the sequins have dulled, and holes have materialised. But still I hold on to them with dear life until I could find another red pair to take their place.

I don't know what reason propels my intense attraction to them. Perhaps I just love red shoes. Perhaps it's because they make excellent conversation starters, or because they are so different, so unique and so dazzling. But also, perhaps, because I tend to fancy myself as a modern-day, real-life Vianne Rocher--the heroine in Joanne Harris' acclaimed novel Chocolat--who wore red shoes while attempting to make chocolate that heal the ills of people's hearts and minds.

Of course, my thoughts are as far-fetched as it could be. At work, I am obliged to wear black safety shoes that are the ugliest things I've ever bought. At home, I usually go bare-footed. It seems that fate does not approve of me wearing my red shoes while I'm making chocolates. Oh well, one day maybe, when I can finally call all the shots....


Lemon and Thyme Truffles
(from the Australian Women's Weekly Chocolate)

makes 25

250 g white chocolate, chopped
60 ml cream
1 tsp finely grated lemon rind, plus extra
1 Tblsp lemon juice
1/2 tsp finely chooped thyme leaves
250g white or dark couverture chocolate, tempered

Stir chopped chocolate, cream, rind and juice in a small heatproof bowl over a saucepan of simmering water until smooth. Remove from heat, stir in thyme and refrigerate overnight. Working with a little of the mix at a time (keep remainder refrigerated), roll rounded teaspoons of the mixture into balls; place on foil-lined tray. Freeze until firm. Repeat with the rest.

Temper couverture chocolate. You can use eating chocolate too, but I always find them unsuitable for enrobed chocolate as they are too thick even in liquid form. Working quickly, using 2 forks (or a fork and an offset palette knife), dip truffles in melted chocolate. Place truffles on a pre-chilled tray and sprinkle with extra rind.

The recipe recommends refrigerating truffles, but I find this unnecessary, as the chocolate sets pretty quickly due to the cold from the frozen truffles. Also, refrigerating tempered chocolate is a big no-no as it creates condensation which leads to blooms forming on the surface of the chocolate. (Happened to me with the dark chocolate---something to do with high humidity and cold temperatures outside and a blasting heater; plus, I stupidly kept them on the dining table overnight...) Oh, and remember to wear gloves when lifting them up; couverture is much more sensitive to heat than eating/compound chocolate. It does sound scary, but for me, the taste, texture and finish of couverture chocolate justifies all of it.


Monday, June 9, 2008

Comfort food for the winter chill


I seem to have an inclination towards rustic, simple desserts of late. It must be the uncharacteristically wet weather we are having--I've never experienced such a wet winter in the past 5 years that I've been in Melbourne.

But I digress. The bread and butter pudding, a traditional English fare, is perfect for a chilly winter's night. This treat emanates the most heavenly smell from the oven, which makes waiting for it to set to the perfect wobbly texture an excruciating experience. Fresh out of the oven, with a sprinkling of icing sugar, bread and butter pudding is the perfect comfort food. You don't have to get dressed up or dolled up to enjoy this dessert; it is unpretentious, and no, it will not judge you on the way you look in your pajamas and spectacles, nor will it ostracize you for the shockingly unrefined way in which you are eating it.

This is a dessert you would eat unabashedly with a big spoon straight from the bowl.


Bread and Butter Pudding
(adapted from The Gourmet Traveller)

serves 6, or 4 very hungry adults

85 g sultanas
2 Tbsp brandy
5 eggs
300ml pouring cream
300ml milk
55g caster sugar
Finely grated rind of an orange
Seeds of 1 vanilla bean
1/2 tsp ground cinnamon
8 slices day-old white bread (or any of your choice; i used raisin toast)
60g soft butter, plus extra for greasing
1 Tbsp demerara sugar
Icing sugar, to serve


Combine sultanas and brandy in a small bowl and set aside.Combine eggs, cream, milk, caster sugar, orange rind, vanilla seeds and cinnamon in a bowl. Whisk to combine and set aside. Spread both sides of the bread with butter and halve lengthways. Scatter 1/3 of the brandied sultanas into a lightly greased 1 litre capacity oven-proof dish (i used 4 x 250 ml ramekins). Trim bread slices to fit dish and layer, scattering remaining sultanas between each layer. Pour cream mixture evenly over bread slices and stand for about 1 hour. Preheat oven to 180C, and bake until golden and custard is firm (30 min for ramekins, 50 min for large dish). Serve immediately, with a dusting of icing sugar if desired.