Sunday, August 31, 2008

A Story of Classic French Pastry, and of Unexpected Disappointments


When I encountered this month's Daring Bakers Challenge, hosted by Meeta of What's for Lunch Honey, and Tony of Tony Tahhan, I was both excited and disappointed. Excited because they have chosen something from pastry demi-god Pierre Herme's book, Chocolate Desserts by Pierre Herme, and disappointed because that something turns out to be chocolate eclairs. I've made these at least three times in the past year, and although they are undoubtedly delicious, I don't find them particularly challenging to make.

However, in the spirit of the Daring Bakers, I decided to play along. I had initially thought of tweaking and playing with the components and to add a bit of my flair to the whole challenge, but I decided that I should give Pierre Herme's recipe a good go, just because, like many other pastry chefs and bakers out there, I worship the man.

So I set out to make the pate a choux, full of hope and expectations with what the recipe invented by the world's most renowned pastry chef would bring to my humble home kitchen. I read through the instructions and sure enough, they were very close to the recipe I had used in the past. Save for the instructions on baking temperature and times. Monsieur Herme's instructions indicated a baking time of 7 minutes at the temperature of 190 degree Celsius, then it spiralled off into propping the oven door open with a wooden spoon and continue baking for the next 13 minutes.

I have 3 problems with this. One: In my past experience, 7 minutes is not enough time to sufficiently brown the choux pastry and make it puff up to its fullest potential. Two: There is no need to prop open the oven door. All you have to do is reduce your oven temperature down to 170 degree Celcius and continue baking for...Three: a further 20-25 minutes to completely dry out the choux pastry, plus an extra 5-10 minutes sitting in the switched off hot oven.

So in total, Monsieur Herme's baking time is short by a bit too many minutes. But I gave the man the benefit of the doubt and proceeded on as per instruction with the first batch. And, just as I had expected, my choux puffs deflated into miserable little slumps a few minutes out of the oven. So unfortunately, Monsieur Herme, this girl is not impressed. I then proceeded to make the consecutive batches using the baking times stated above...and voila!! Perfectly puffed choux pastry!!


A few more things that the recipe failed to mention in relation to the pate a choux:

1. You can check the readiness of the choux pastry by either cutting one open, or by tapping the bottom with your fingers and listening for the hollow sound. I personally prefer the latter.

2. You should spray or sprinkle your oven tray with water. This action helps to create steam in the oven, aiding your choux puffs to turn out as puffy as gravitationally possible.

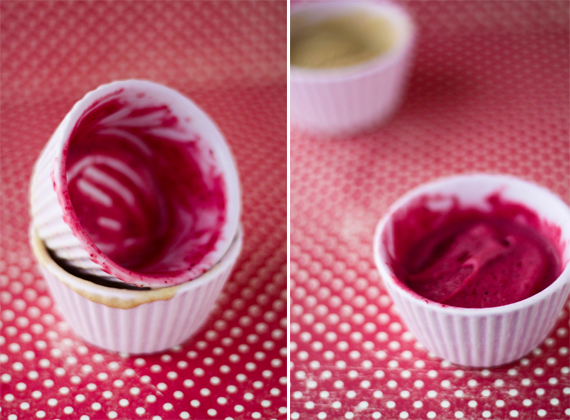
If you think that marks the end of my rant, you are wrong. There are few things worse than embarking on a journey ill-equipped with a bad recipe. So even at the risk of receiving threats and hate mails in my inbox from ardent Pierre Herme worshippers, I am willing to brave the odds to continue. So, first I would have to agree that the pastry cream recipe is fabulous. Other than the fact that it seems that the man enjoys making his fans go round in circles the long way about making it. For example, you do not need to put the mixture in the ice bath and continue stirring it with your tired arms. You can simply put the creme patissiere in a stand mixer and let your paddle do its job of smoothing out lumps and cooling down the cream. And then you can add the butter in chunks. Too easy.

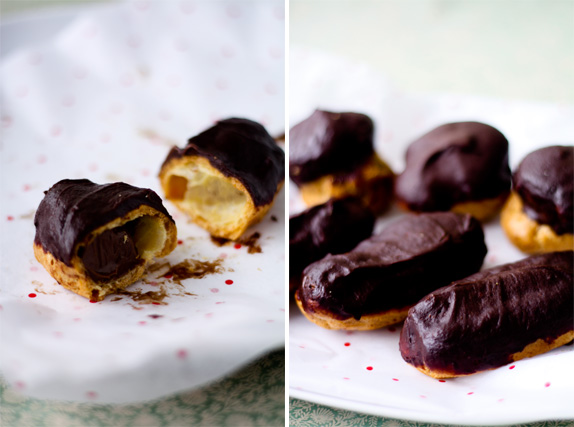
By this time I was rightly disillusioned, but the worst was not over for me. The most disappointing part of this challenge is the chocolate glaze. I contemplated using my own chocolate ganache recipe which is 10 times simpler and had never disappoint. I again gave Monsieur Herme the benefit of the doubt and went along with his version.

Sigh. Either the stars are not aligned for me to make any of Herme's creations right, or his recipes are just not what I had expected them to be. To end in a sort of anti-climax, I find the chocolate glaze very difficult to handle. The glaze is too thin at its shiniest stage, and turned dull when cooled. Totally not what I expected. By this time I had completely lost faith and gave up. I did not even bother to decorate it or even to take proper photographs.

Don't get me wrong, I still think that Pierre Herme is one of the greatest pastry chefs in the world, and I would definitely not miss the chance to visit his famous patisserie the next time I'm in Paris. But I don't think that the recipes in his books are a true testament of the man's ability to create the exquisite pastries, cakes and desserts that he is renowned for, and thus I have struck Chocolate Desserts by Pierre Herme off my to-buy list. At least for the moment, or until someone could convince me that it is actually a worthwhile purchase. So here's my second Daring Bakers Challenge, and may the third one be more of a success for me.


PS. Meeta and Tony, thank you both so much for your effort in putting together this challenge. I hope I did not offend you by saying what I said in this post. It is purely my opinion of the recipe, and not at all to put blame on the lovely hosts that have taken the trouble to make this challenge come together for the month of August.

Thursday, August 21, 2008

An Ode to Tradition, and a Love Affair with Tea


I confess to having a certain uncanny affection for old-fashioned things. Be it the cut of a skirt (high waisted, full and somewhere around the knee), or a social culture in the form of afternoon tea. Of course, owing to the fact that I did not grow up in Europe or even any parts remotely close to the Northern Hemisphere, I only picked up the habits while I was growing up.

But really, I think that I have a certain affection to tea, even years before it was revived and elevated to its present status. I remembered playing with my mother's collection of patterned tea cups as a child, imagining as to when I will use them based on their patterns (little sprigs of flowers for spring, little fruits for summer---yes, the obsessive streak showed early; and no, we don't have 4 seasons in the tropics but what does a 7 year old care?) My obsession went so far as to buy an entire display tea set with my pocket money when I was about 10 years old. I got into trouble for it, but how could I explain myself?


And then, I don't remember how or why, but I grew out of it. There were certain lapses, but for the most part of my adolescence, I was not attracted to tea. I still drank the stuff, but less like a ritual and more like a common beverage. And then I moved to Melbourne. While during the first few years I was immune to the charms and attraction of the beguiling tea shops scattered around the city; I was nonetheless drawn in again, I think much in the same way that you are drawn to an old flame that did not really quite die down.

So after all these years, I once again find myself besotted and fatally attracted to my unresolved love affair with tea. I think my recent discovery of Laura Childs' Tea Shop Mystery series worsened my infatuation to unprecedented proportions. It was truly a case of the books choosing me, not the other way around. Set in the beautiful city of Charleston, South Carolina---Oh Helen, how lucky you are!---this book is all the things that I love bound into one neat little package that fits in my handbag: tea and food spiked with a dose of light-hearted mystery...what's not to like??

Putting into context my current re-obsession with tea, I decided on having some traditional English treats to go with my cup of afternoon tea. I've owned Sherry Yard's Desserts by the Yard for quite some time, but have not had time to make something from the recipes within. When I decided to make these, I had quite a few recipes at my disposal, but decided on Sherry's because 1. She claimed that her recipe is based on the traditional British version of the now world famous snack; and 2. All the ingredients needed are already part of my kitchen arsenal.


Traditional English Scones
adapted from Sherry Yard's Desserts by the Yard

2 cups all purpose flour
1/4 cup sugar, plus more to sprinkle
1/2 teaspoon baking soda
1/2 teaspoon cream of tartar
1/8 teaspoon salt
4 ounces or 114g cold unsalted butter, cubed
1 large egg
1/4 cup heavy cream, or more as needed
1/4 cup milk, or more as needed
Milk for brushing


Preheat oven to 200C. Line baking trays with greaseproof paper. Sift flour, sugar, baking soda, cream of tartar and salt into a bowl. Rub in butter until the mixture resembles fine breadcrumbs. In a separate bowl, whisk egg, cream and milk. Add to the flour mixture and mix/knead just until the dough comes together. Do not overmix. If it seems dry, add a bit more cream or milk, a tablespoon at a time*. Dust your working area with flour, and shape the dough into squares, or triangles, about 1 inch thick. Flip the scones over and place on the greaseproof paper lined trays. This will ensure even rising when bakes. Brush with milk and sprinkle with sugar. Bake for 15-20 minutes, until dark golden brown and puffed.

*This is Sherry's suggestion. I didn't think that my scones need the extra liquid, but then again, I've never made scones so I won't be quite sure.

Devonshire Cream
makes one cup

1/2 cup mascarpone or cream cheese
2 tablespoons sugar
1/4 teaspoon cream of tartar
1 teaspoon vanilla extract
1/2 cup heavy cream (35% fat)


Place the mascarpone or cream cheese in the bowl of a stand mixer fitted with the paddle attachment. Add sugar, cream of tartar and vanilla and blend well on low speed. Without stopping the machine, stream in the heavy cream until well blended. Scrape into a bowl and cover with clingfilm until ready to use. (The cream will keep, covered and refrigerated, for 2 days).


Forest Berry Jam

250g frozen forest berries mix (or substitute any berries you like)
1/4 lemon, juice only
225g caster sugar

Place the berries and lemon juice in a heavy based saucepan over low heat.
Gradually add sugar while stirring. When the jam boils, skim off any impuritires to improve the clarity of your jam. Reduce the heat and simmer, stirring occassionally to prevent it from sticking to the bottom of the pan and burning. After 20-30 minutes, check the jam. It should be thick and be able to hold its shape.


P.S. This is not the pleasant surprise I had hinted in the previous post. I promise I'll get to it in my next one. ;)

Monday, August 11, 2008

M.I.A

I'm afraid I'm going to have to go missing from the blogosphere til' next week. Reason being my hard drive crashed late last night, taking with it all my photos, programs and assignments. Sigh. The hard drive has just been replaced, but after this comes the daunting task of putting all the programs back on my computer and then re-editing and laying out all my photos for my next post (which was what I had just finished doing when it crashed). Then comes my looming deadline for my business plan next week. So yes, I will be taking a break here, but come see me next week and I'll have something special for you ;)

Monday, August 4, 2008

Revealed: My Other New Toy

Remember in my last post I said that I was going to introduce you to my other new toy? I have been waiting a long time to write this up. I got the machine before I got my Canon DSLR, but have resisted the urge to post anything because I was waiting for the new camera to arrive. And when it finally did, these were the first photos I took. But then I was getting busy completing my first Daring Bakers Challenge, and since that had a deadline, it took precedence over my regular blogging.

But here we are finally. As much as I want to exclaim "And the new toy is....." while whisking away a red velvet shroud covering the surprise, the more impatient of you (yes, I'm looking at you Oakley), would've scrolled further down first thing to discover what my new gadget is. So yes, it's an automatic ice cream maker. Which I got at approximately half the retail price.

The machine is a factory second that was selling for $159 at the Preston Market. I was skeptical at first, but turns out that there was no major damage or anything that would affect the normal operation; the only reason it was sold so cheaply was due to a minor scratch on the wall of the cannister. And it came with a 6-months warranty. So yes, the bargain shopper in me could not resist. To tell you the truth, I've had my eyes on it since a few months ago, when I first saw the machine. But it was priced at $200 then. It was a good $100 cheaper than the retail ones, but I still had to consider it.


And then J and I celebrated our first full year of being together (it may not seem like a lot of time together, but trust me, it is my longest and best yet). He asked me what I wanted for a present, and a few days plus a few hours of heavy lifting (mostly done by him) later, my glossy new machine was well set up and roaring to go.

The first recipe that came to mind was Claire Clark's Quick Strawberry Ice Cream, from her book Indulge:100 Perfect Desserts. Most ice cream recipes you find will contain either eggs or egg yolks, as their addition makes the ice cream taste richer and creamier. This one, however, uses only double cream. In her book, Claire explained that the first time she saw her friend Matthew Hardy---who was also her fellow lecturer at Le Cordon Bleu--- prepared it for an ice cream demonstration class, she was shocked and convinced that it wouldn't be as good as the egg-based ones. But to her surprise, the resulting ice cream was just as rich and creamy as the ones she had made in the past.

I did two variations on this recipe---one using frozen forest berry mix, and another using bananas. I also played around with the recipes for a bit, after J insisted that I was puree-ing way too much berries for the mix, and because I find that brown sugar goes much better with bananas.


Forest Berries Ice Cream

300g frozen forest berries (you can substitute any kind of berries)
320g caster sugar
500ml double cream

Method:
Puree berries in a blender and then pass through a fine sieve. Mix half the sugar with the cream and bring to the boil. Pour this over the berry puree and mix well, then stir in the rest of the sugar. Leave to cool completely. Churn in an ice cream machine according to the manufacturer's instructions (it took 15-20 min for mine to be ready).


Banana Ice Cream

300g bananas
180g brown sugar*
60g caster sugar
250ml double cream

Puree the bananas in a blender. Be sure to choose very ripe bananas for best results. Mix 120g of brown sugar with the double cream, and bring to boil. Pour this over the banana puree and mix well, then stir in the remaining 60g brown sugar and 60g caster sugar. Leave to cool completely. Churn in an ice cream machine according to the manufacturer's instructions (it took 15-20 min for mine to be ready).

*Although I find that brown sugar goes better with bananas, I noticed that it alters the texture of the ice cream. The end result is a softer and stretchier ice cream. I am not sure about the chemical explanation to this, but I can guess that it has to do with the molasses contained in brown sugar. The recipe recommends the use of caster sugar, but feel free to experiment with the proportions o brown sugar if you like.

Enjoy!!